Showing posts with label diy. Show all posts

Thursday, July 5, 2012

THE 4TH ON THE 5TH.....


.....because i really just wanted to chill out last night after our big day with friends:)
my mom made the most INCREDIBLE gluten-free flat sugar cookie and used frosting to make an American flag. yeah, she pretty much rocks and ALL 11 kids that were there ate them and LOVED them. SCORE!

girls were decked out in their red, white and blues

we got to the Blunt's house and it was immediate business time for the children in the baby pool. Wilson had some serious matters to discuss with the ladies. Harvest was a bit shocked and Lucy was putting in her 2 cents, per usual. i'm not quite sure what they were talking about but i do know it was INTENSE!

After, Lucy needed to refuel with a carrot

Wilson went back to having happy times in the water and giggling like a champ

Sky arrived a little bit late to the party because she was in deep slumber, which we don't mess with because that girl NEEDS her naps, but she settled right on in with no trouble at all:)

JJ offered me a sip of his lime flavor-ice (so generous) and then posed with all kinds of personality for this pic. the kid's to cool for school.... love him
Lucy and i picked up some elastic headbands on the way home and then it was baths, bottles, music and rocking the kiddos to sweet, sweet slumber

I spent my evening sewing fabric rosettes & plan on making them with velcro backs so they can be interchangeable. i was against the headbands for a LONG time, particularly the ones with the LARGE bows atop. well, time changes things and i've slowly warmed up to the idea. these bands are relatively thin and the rosettes are no more than 1 inch in diameter so they aren't such a "statement piece". i'm excited about them:)
it was a GREAT day! i love my life. i love my friends.
XOX, rachel
(p.s. i used this tutorial as a guide for making my rosettes. i added my own personal touch to them but i think this video is easy to follow and can help to get you started, if you're interested)

Thursday, January 13, 2011

DIY Wedding CenterPieces for under $100!?!?


first off, NO, I'M NOT JOKING.......
katie, my soon to be sis-in-law, (in just 2 days!!!) rallied my help to make the centerpieces for the big day. their colors are red n' black (same that me & my man had), they are having a big wedding, they don't have a lot of money (again, same as us).
we set out to make 25 CENTERPIECES with only $100.
WE DID IT FOR $90!

here's what we bought:

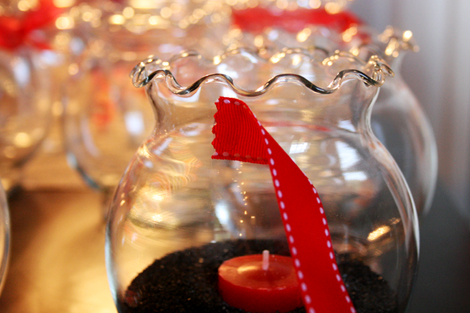
a glue gun, tea lights, scissors, japanese washi tape, a few spools of ribbon, glue sticks for the glue gun, black decorative sand.....
25 clear glasses and/or vases of different shapes and sizes,
25 black vinyl records with red centers!
we thrifted all of these last 2 and they were only 25 CENTS a piece- the glasses were even 50% off-SCORE!!

we started off by using the glue gun to attach the ribbon to the glass. then we wrapped it around, snipped it and used another dab of glue to set it:)
katie used sheer ribbon to tie bows around some of the tops and bottoms

then we attacked some glasses with a variety of japanese washi tapes. this was so much fun to make patterns with:)

use scissors to cut the tape at the top & press firmly down around the top edge of the glass

since we only bought 8 bags of sand we had figured out that we could get 3 glasses filled out of each bag. i like to be presise so i measured out each glass.... neurotic? perhaps:)

the last step was placing the tea lights in the sand. we pushed them down a little bit, about halfway, so they would stay centered

place glass in the center of a record and you're DONE!
(all the tablecloths are going to be white so the black will really pop against these)
here is the breakdown of the dollar bills:
1 glue gun $7.99
1 bag of tea lights $3.99
scissors were free because who doesn't have a pair?
6 rolls of washi tape $3.50 each
3 spools of ribbon $2.99 each
1 bag of glue sticks $2.99
8 bags of sand $2.99 each
25 thrifted vinyl records  $.25 each (a steal!)
25 thrifted glasses $.25 each (plus 50% off!)

we spent about 90 bucks including tax annnnd we've got plenty of washi tape n' ribbon left over to get crafty with at a later date!
this was fun, inexpensive and the end result looks so perfect and is SO VERY MUCH a reflection of the soon-to-be
Richard & Katie Demsick!
huge congrats to them:)
xox, rachel

Thursday, December 9, 2010

BRIGHTER & More FESTIVE

as i mentioned yesterday, i found cardboard cones and bought brighter, shiny cardstock to make more trees that were inspired by this DIY:
Lolly Chessie's Famous CP Christmas Trees
this time i used a scalloped paper punch which i liked a LOT more:)
i am going to paint the tops red!
as you can see i still have 2 more trees to go.....
i highly recommend this project.
it takes time but not too long where you just want to throw in the towel.
also, you can do it in steps and take breaks in between:)
get your craft on!
xox, rachel

Tuesday, December 7, 2010

Gettin Crafty

today i had some serious target & michael's therapy
new pearl lights for the office- CHECK!
jolly rancher and sweet tart candy canes for the tree- CHECK!

then things got a little tricky, but i like to improvise on DIY projects so here i goooo:)
i couldn't find a paper tree like i wanted, just this HEINOUS green styrafoam one.
but i was on a mission!
first things first, COVER IT UP
1. glue gun a square of red felt to the bottom of the tree
2. cut off the extra at the base
3. i used this paper ribbon stuff to start wrapping the tree
4. add some glue to start and then get wrap wrap wrapping!
(i applied little strips of glue every ten wraps or so to make sure everything stay secured)
5. switch colors whenever you feel like it
keep in mind this project is still "in the works"
now i am using a craft punch in the shape of a tag to possibly make petals for the tree?
i will keep you updated as this tree progresses.....
here is where i got my original idea from:
Lolly Chessie's Famous CP Christmas Trees
isn't that one stupendous?

tomorrow i need to chill in prep for some super fun (heavy sarcasm) tests i'm getting done on thursday so i'm sure i will be crafting away and hopefully sharing:)
xox, rachel

Tuesday, November 30, 2010

My Felt Ball Wreath!!!!

since i have to go to the dr. nearly every single day this week, lets NOT talk about it, i decided i needed sum holiday cheer!
lissa, caroline and myself went out and bought the goods
i made caroline wear/play in the materials
here i goooo......
and a little bit more.......
and here is what i have so far!
this thing is gonna be rad when it's done. it's taking quite a long time but anything to take my mind off my mind:)
what are you making? i wanna do a bunch of DIY decorating this year.
chances are this wreath will stay up ALL year round.
xox, rachel